Introduction
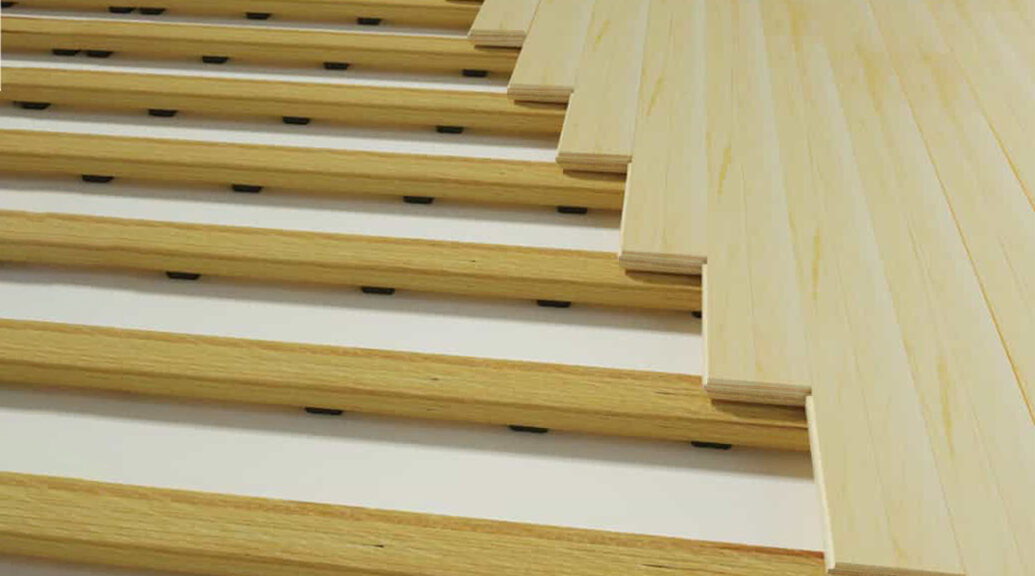
Skating and playing inline hockey at home can be much fun and good exercise. The right kind of flooring makes it even better. Appropriate flooring is smooth for your skating experience and safe against falls and injuries. The HomeGamer Interlocking inline hockey and skating court flooring is one great choice for composing your home skating court.
These tiles are conveniently set up to interlock into one another easily; hence, the installation is easy, even for a novice. They are durable, easy to clean without much hassle, endurable to the elements, and make for a great skating and hockey playing surface.
In this guide, we will show how you can make inline hockey and skating court flooring on your own using HomeGamer Interlocking Sports Tiles. Following these steps, you will have a quality skating area for you and your family to enjoy for years! Away we go!

Tools and Materials Needed for Inline Hockey and Skating Court Flooring
Before the actual installation process of your inline hockey and skating court flooring, you need to prepare or join a few things that are required with the intention of installation. Here’s a list:
Essential Tools:
HomeGamer Interlocking Sports Tiles: These are your done flooring material, so ensure you’ve gotten enough to account for your square footage or space. They quickly lock together.
Rubber Mallet: This tool gently taps the tiles into place. It secures locks for the tiles without breaking them, making the installation process more manageable.
Measuring Tape: This is used to take measurements of spaces. It helps to ensure that you purchase the correct quantity of tiles. Measurement also eliminates unnecessary spaces while leaving no spaces.
Utility Knife: Used to cut the tiles that should be inlaid at the edges and corners. It’s clean and precise, and it’s a sure-shot must-have for the custom shape of tiles.
Chalk Line: A tool to ensure straight lines on floors. This tool is used to outline floor straights, making an application of top or adhered-down flooring go quickly and with a good appearance.
Straight Edge or Ruler: Straight edges help you cut straight with your utility knife by helping you get clean edges or cutting; they do not harm your surface.
Protective Gloves: They will ensure that your hands are protected from tile cuts and other tools. They prevent the injuries one is most likely to experience with jagged edges. These gloves would be comfortable to wear during the process.
Broom or Vacuum: It will be used to clean up the subfloor before the commencement of work. It guarantees freedom from dust at the surface and better adhesion of tiles.
Level: Check to ensure uneven surfaces. It is essential to achieve this level. It will help prevent humps or ridges.
Optional Tools:
Adhesive or Edge Strips: This will keep the edge tiles from moving quickly and keep the original remover away. Suitable for those nonmoving tiles. Helpful for a more permanent install.
Keep all these tools and materials ready to make it easy and save time throughout your installation. Now that you are all prepared, let’s start on the first phase: preparing the space for your new inline hockey/skating court.

Preparation Steps
It is where you start with the area preparation for your inline hockey and skating court flooring. Proper preparation ensures a smooth installation and durability of the court over time. Follow these steps to get your space ready:
Choose the Location
Select a flat, stable area—one that is level and does not have large bumps or dips. It helps keep the tiles lying flat and in their places. The measurement of your space shall be obtained to ensure it is big enough for your use, and proper allowance must be made for space around the court to maneuver easily.
Remove any rocks, sticks, or other debris that may be in the way of installation. A clean area increases the insurance of better tile adhesion.
Measure the Area
Accurate Measurements: You can make measurements of lanes or road easements ranging in length and breadth. It may be required when figuring out the number of tiles covering the surface.
Double-Check Your Numbers: Check and re-check your figures to prevent making errors. Accurate measurements ensure you have ordered only a few tiles.
Consider Border Tiles: Allow for edge tiles when measuring, as there may be edge tiles that require cutting. It will give you an accurate fit for your court.
Prepare the Subfloor
Clean Thoroughly: The flooring should be swept or vacuumed free of dust, dirt, and debris. A clean surface helps the tiles adhere better.
Check for Level: Run a level over the subfloor to determine if it’s flat. Where a disheveled surface prevails, it allows the tile to move or buckle.
Repair Any Imperfections: Holes and cracks on the subfloor must also be filled first. As there is a need for a smooth surface, it becomes essential since an unevenly structured surface further leads to an unstable installation.
Plan the Layout
Lay Out a Few Tiles: Place a few tiles on the floor as a reference beforehand so you have a clear idea of setting them out before installing the whole floor or wall. It aids in the visualization.
Use a Chalk Line: Measure and Snap a Chalk Line. Mark the center of the area with a chalk line. This section represents the starting point for setting the tile for equal coverage.
Decide on a Pattern: Decide upon a tile pattern that you like. It can be laid out in your head, but doing so before installation will create a much more organized installation.
Following these steps during the preparation procedures will set an excellent first base for your inline hockey and skating court flooring. Let’s move on to the installation since the setup is now complete.

Installation Process of Inline Hockey and Skating Court Flooring
After laying them down, now that your area is all setup and ready, it’s time to get going. Here are features to easily install the HomeGamer Interlocking Sports Tiles for a successful, smooth job:
Start from the Center
Locate the Center Point: The first thing to do is locate the center of your prepped space. It allows for everything to be correctly laid out.
Place the First Tile: Starting in the center with the first tile. It will be your baseline tile, which all other installations will rely on to get them in place.
Work Outwards: When proceeding from the center, take outward directions without making it disorderly. Enough detail keeps it balanced and, therefore, symmetrical.
Snap Tiles Together
Align the Tiles: For a transition row or any added tile after the first, align the edge of the tile joining to the previously laid tile first. Make sure the connectors are in the correct position before a snap.
Use a Rubber Mallet: Use a rubber mallet to tap the tiles, lightly break the joints, and make sure the tiles fit close.
Check for Gaps: The gap test should be done on the gaps between the tiles. Where found, the same must be adjusted consequently to make the surface continue to be on a level base without undulation or protuberance.
Securing the Perimeter
Check the Perimeter: Run a check on the perimeter to see if there are any loose tiles after all the tiles have been laid. Repair these so they cannot be moved in the future.
Use Adhesive: Apply a minimal amount of adhesive to the base of the tiles surrounding the perimeter to ensure their stability within the design.
Install Edge Strips: You should install edge trim around the perimeter. These will give your look a finished, polished edge and provide a little more strength.
By following these installation steps, you’ll have professional-quality inline hockey and skating court flooring in no time. Next, we’ll cover some tips on maintaining your court to ensure it stays in excellent condition for years.
Maintenance Tips
Inline hockey and skating court flooring care and maintenance, as well as regular cleaning of your skating area, are essential. Proper court maintenance will keep it safe and enjoyable to use for years. Inline Hockey/skating Court HomeGamer Interlocking Sports Tile Maintenance Tips:
Regular Cleaning
Sweep the Surface: Regular sweeping of the court to naturally or mechanically sweep away dust, dirt, and general debris precludes a build-up on top of the surface that could impact the performance of the tiles.
Vacuum as Needed: Use this if the cleaning is more profound. It will take up finer things that the broom doesn’t.
Use Mild Cleaning Solutions: In case the tiles become dirty, clean them off with a mild soap solution and water. Avoid using complex chemicals since they can impact the surface.
Inspect for Damage
Routine Checks: Regularly check the tires for wear and tear. Also, check for crazing, chipping, etc., in any other section of the tiles, which may require attention.
Replace Damaged Tiles: It is essential to replace chipped, damaged tiles immediately to prevent additional damage and maintain the court’s integrity.
Check Connections: Ensure the interlocking mechanisms are tight. A loose tile creates a trip hazard.

Avoid Harsh Chemicals
Safe Cleaning Products: Always use gentle cleansers and avoid abrasive materials when cleaning the court. When cleaning, avoid abrasive materials; harsh chemicals can be detrimental and make the tile material deteriorate.
Rinse Thoroughly: After cleaning, the tiles should be thoroughly rinsed with water, which removes the residue of finishes that could make the surface slippery.
Test New Cleaners: Test new cleaning agents on a small, hidden area at first. Make sure they do not discolor or do any harm.
Protect from Extreme Conditions
Weather Protection: If the court is outside, protect it from bad weather by covering it with a cover, for example, during heavy rains or snow, to avoid damage from water logging.
Avoid Direct Sunlight: Sun exposure may lead to fading over some time; wherever possible, ensure protection either with the shade or the use of UV-resistant tiles.
Manage Temperature Changes: Tiles should not feel very cold and should still be tolerated with your skin.
Staying on top of this helpful maintenance will allow your in-line hockey and skating court to continue functioning at its highest level. Regular maintenance extends the life of your HomeGamer Interlocking Sports Tile, creating a safe and action-packed surface for whatever you can throw at it. Next, let us cover what not to do during installation.
Conclusion
Finally, DIY the installation of an inline hockey and skating court flooring right in your home with HomeGamer Interlocking Sports tiles. Follow the preparation, installation, and care steps in this guide to assist you in creating a quality, resilient surface for endless hours of fun and exercise. Proper installation and regular upkeep keep your court strong for safe and enjoyable play through many years.
Call to Action
Ready to transform your space? Visit VMKON to purchase your HomeGamer Interlocking Sports Tiles today. Share your installation photos with us on social media and join our community of home sports enthusiasts!